If you don’t want to read the article, you can skip to the tutorial near the bottom of the page.
I recently completed an article on the problems of increasing the resolution of a low resolution image. The basics of it is that there is a rule in computer graphics that states that if you want a high resolution image you must start with a high resolution image. In nearly all cases this is true, but like I mentioned in the other article Adobe, the makers of Photoshop is working towards automating the process using a kind of AI to increase the amount of pixels in an inch (ppi) and still retain the same look of the original image.
For this article I want to go over the process of making a low resolution image print-ready, 72 ppi to 300 dpi, in Photoshop. Before we start though, I want to make sure that I acknowledge that you have always been able to do this manually. What I mean is that if you have the time and patience to sit and use multiple filters, tools, and effects in PS you could probably get close to a good final product. The truth though is that few of us have the patience to actually do this. It also takes a good artistic eye to know that you aren’t destroying the overall ‘look’ of the image. The last thing you want is to have a high resolution image of a plastic looking model (unless the model was plastic to start with). So this article is using automated processes to have PS do the grunt work.
I want to do a shout-out to the inspiration for this tutorial to the Youtube channel, piximperfect. If you are the type of person that prefers a video over a written tutorial, then head over to youtube to watch his/their video.
Software needed
You will need to use a Creative Cloud (CC) version of PS to be able to use the tools I do in this tutorial. If you don’t have a CC version you can still use a more manual way of accomplishing the tutorial, but I won’t be going over it here.
The easiest way to increase the resolution
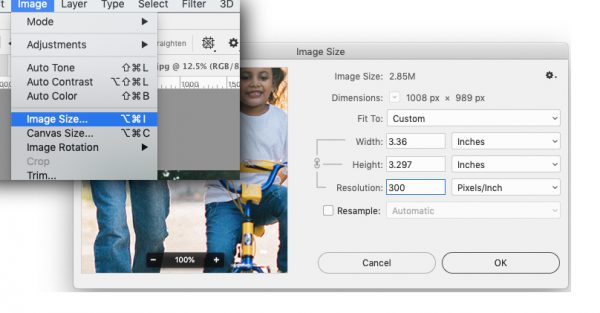
In PS go to Image/Image Size and in the dialog window, simply increase the resolution to 300 ppi. What you should see is that the dimensions of the image are now smaller. The once 14″ x 14″ image is now changed to 3.333 x 3.333 inches. Note, if you didn’t get that result, make sure that “Resample” is not checked.
 Congratulations, if the dimensions of the image fits the size that you needed, then you’re done and nothing else is needed.
So what happened? This can kind of be a little confusing but it makes complete sense if you look at it through math. The 14″ x 14″ image has been reduced the same ratio as the resolution has been increased. So we started with 72 ppi and increased it to 300 ppi, we divide 300 by 72 and we come up with 4.17, yeah? Now we divide the 14″ dimension by 4.17 and we should get 3.35″ taking rounding into consideration. What used to take 72 pixels per inch to show now takes 300, so 14″ becomes 3.35.”
If you remember when changing the resolution, that size of the image is inversely proportional to the resolution of the image you should not have any problems. This works for decreasing the resolution as well.
Examples of the result of changing dimensions of an image
| Original dimensions in pixels per inch | Original Resolution | Changed resolution | Result dimensions in pixels per inch | Comments |
|---|---|---|---|---|
| 1200 x 1200 | 300 ppi | 150 ppi | 2400 x 2400 | We decreased the resolution by half, so we doubled the dimensions. |
| 350 x 700 | 72 ppi | 300 ppi | 84 x 168 | We increased the resolution which decreased the dimensions. |
| 425 x 300 | 150 ppi | 72 ppi | 885 x 624 | 150 to 72 increases the dimensions by a factor of 2.08 |
What resolution should you use?
I wanted to touch on this before we moved over to PS. It is directly relatable to what size your image must be for certain purposes. For example, what resolution do you need for an image that will be displayed on a web page? What about the resolution for something that you are going to print? I’ve included another table to help you decide what your resolution should be for the intended use.
| Intended use of the image | Minimum ppi/dpi | Optimal size | Additional sizes used in ppi/dpi |
|---|---|---|---|
| Web/Online | 72 | 72 | 92 |
| Optimized Web Documents (pdf) | 72 | 150 | 300 |
| Print Low Resolution | 150 | 150 | |
| Print High Resolution | 300 | 300 | |
| Apps IOS | 160 | 326 | Too many to list |
Finally, we can now move over to PS to let Adobe’s new, almost AI technology help us with the process.
If PS isn’t opened yet, open it up and add your chosen image that you want to increase the ppi with. Remember, dimensions matter.
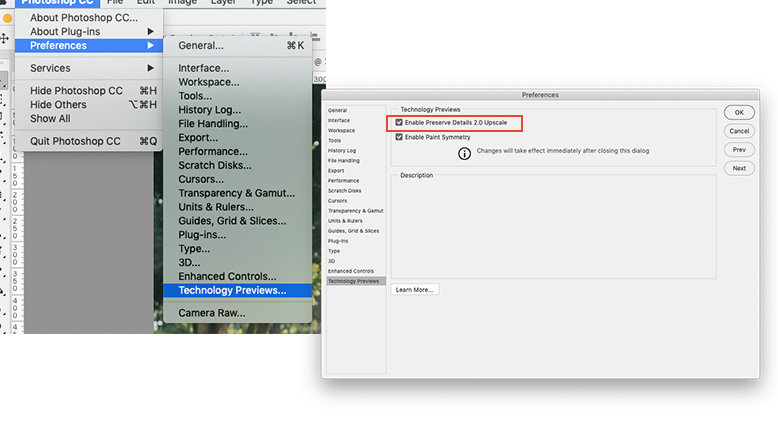
Go to Photoshop/Preferences/Technology Previews
When the dialog box opens tick the box labeled “Enable Preserve Details 2.0 Upscale.”
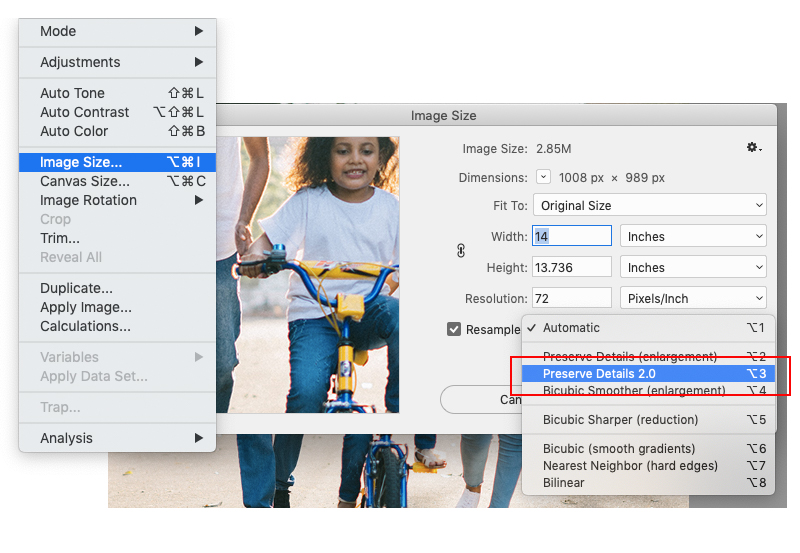
Now go to Image/Image Size in the menubar
After the dialog box opens, you will need to click on the dropdown menu (probably says, Automatic) and select Preserve Details 2.0
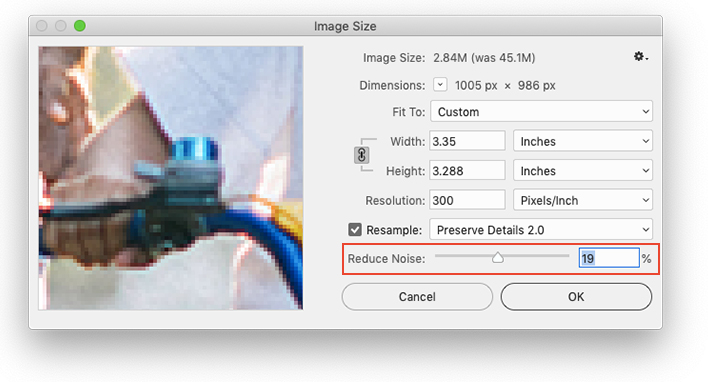
Now change the resolution of your image
You’re almost done, the last thing that you need to do is adjust the “Reduce Noise” slider to fit your preferences. You might find it easier to judge the results of your changes by zooming in on an area of the image that has a lot of detail in the preview window.
Alright, so that’s basically it. Assuming that you’ve got the correct size and ppi for your intended use, and maybe more importantly, you’ve got an image that isn’t pixelated or blurry, you are good to go.
One thing to remember.
This technology is new”er” and I still get mixed results using it. You should not expect that every image that you want to increase the resolution will turn out perfect using this method or any other. Until the software is able to understand what the image is, and is able to determine “rough” areas that need work, it is ultimately up to you to make final decisions. The best result you will get though is starting with a high resolution image.
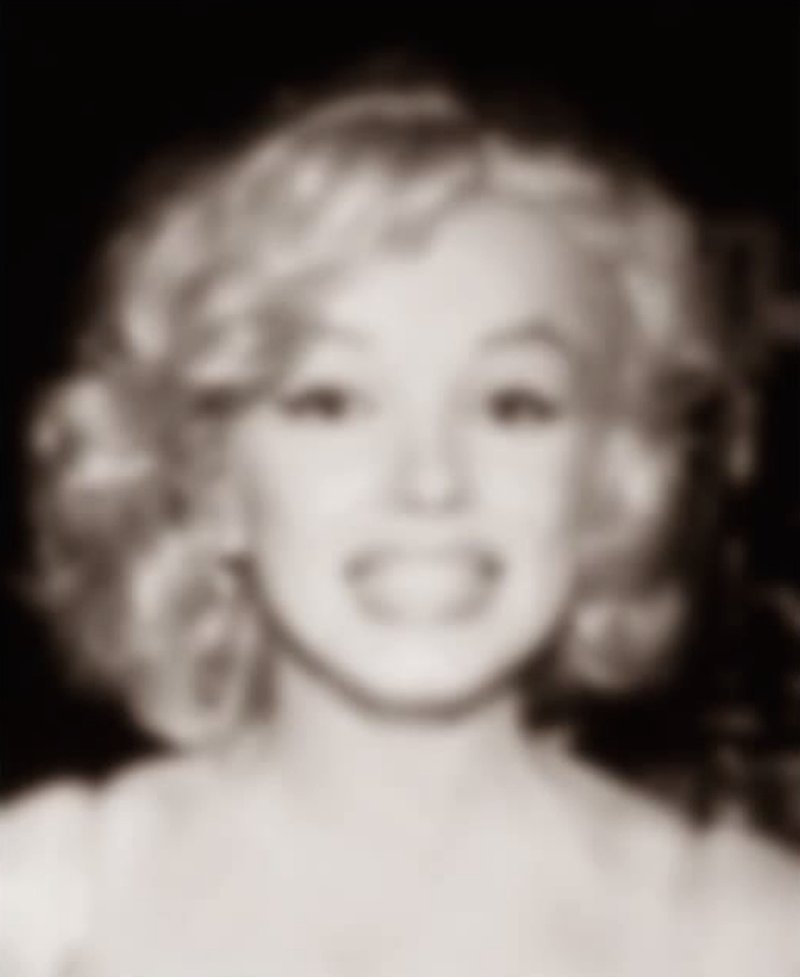
 One of the core understandings in computer graphics is that if you want a high resolution image, you must start with a high resolution image. Forget all the tv shows that you’ve seen where the person is standing behind a computer technician asking them, “Can you sharpen the image a little more?” The computer technician maybe clicks a few buttons and the suddenly the license plate that was too blurry to read becomes crystal clear. It’s a miracle, the computer can do anything! Sorry, that isn’t real life, at least with current technology. A computer can do a lot of things, but when it comes to enhancing low resolution imagery the computer at best must ‘guess’ what the image is.

 Alright, we’ve all been hearing about deepfakes lately. For those of you who haven’t heard, deep fakes, by my understanding, are computer generated fake imagery, usually in the form of videos, of people doing or saying things that they wouldn’t normally do or say. This video is the perfect example.